1. Overview
Welcome to the Agent Builder guide! This guide will assist in:
- Create Agents
- Create Actions
- Attach Actions to Agents
- Test Agents
- Deploy Agents
2. Step-by-Step Instructions
Navigation
Navigate to Home Page > Automation Hub > Workflow Manager > Agents. 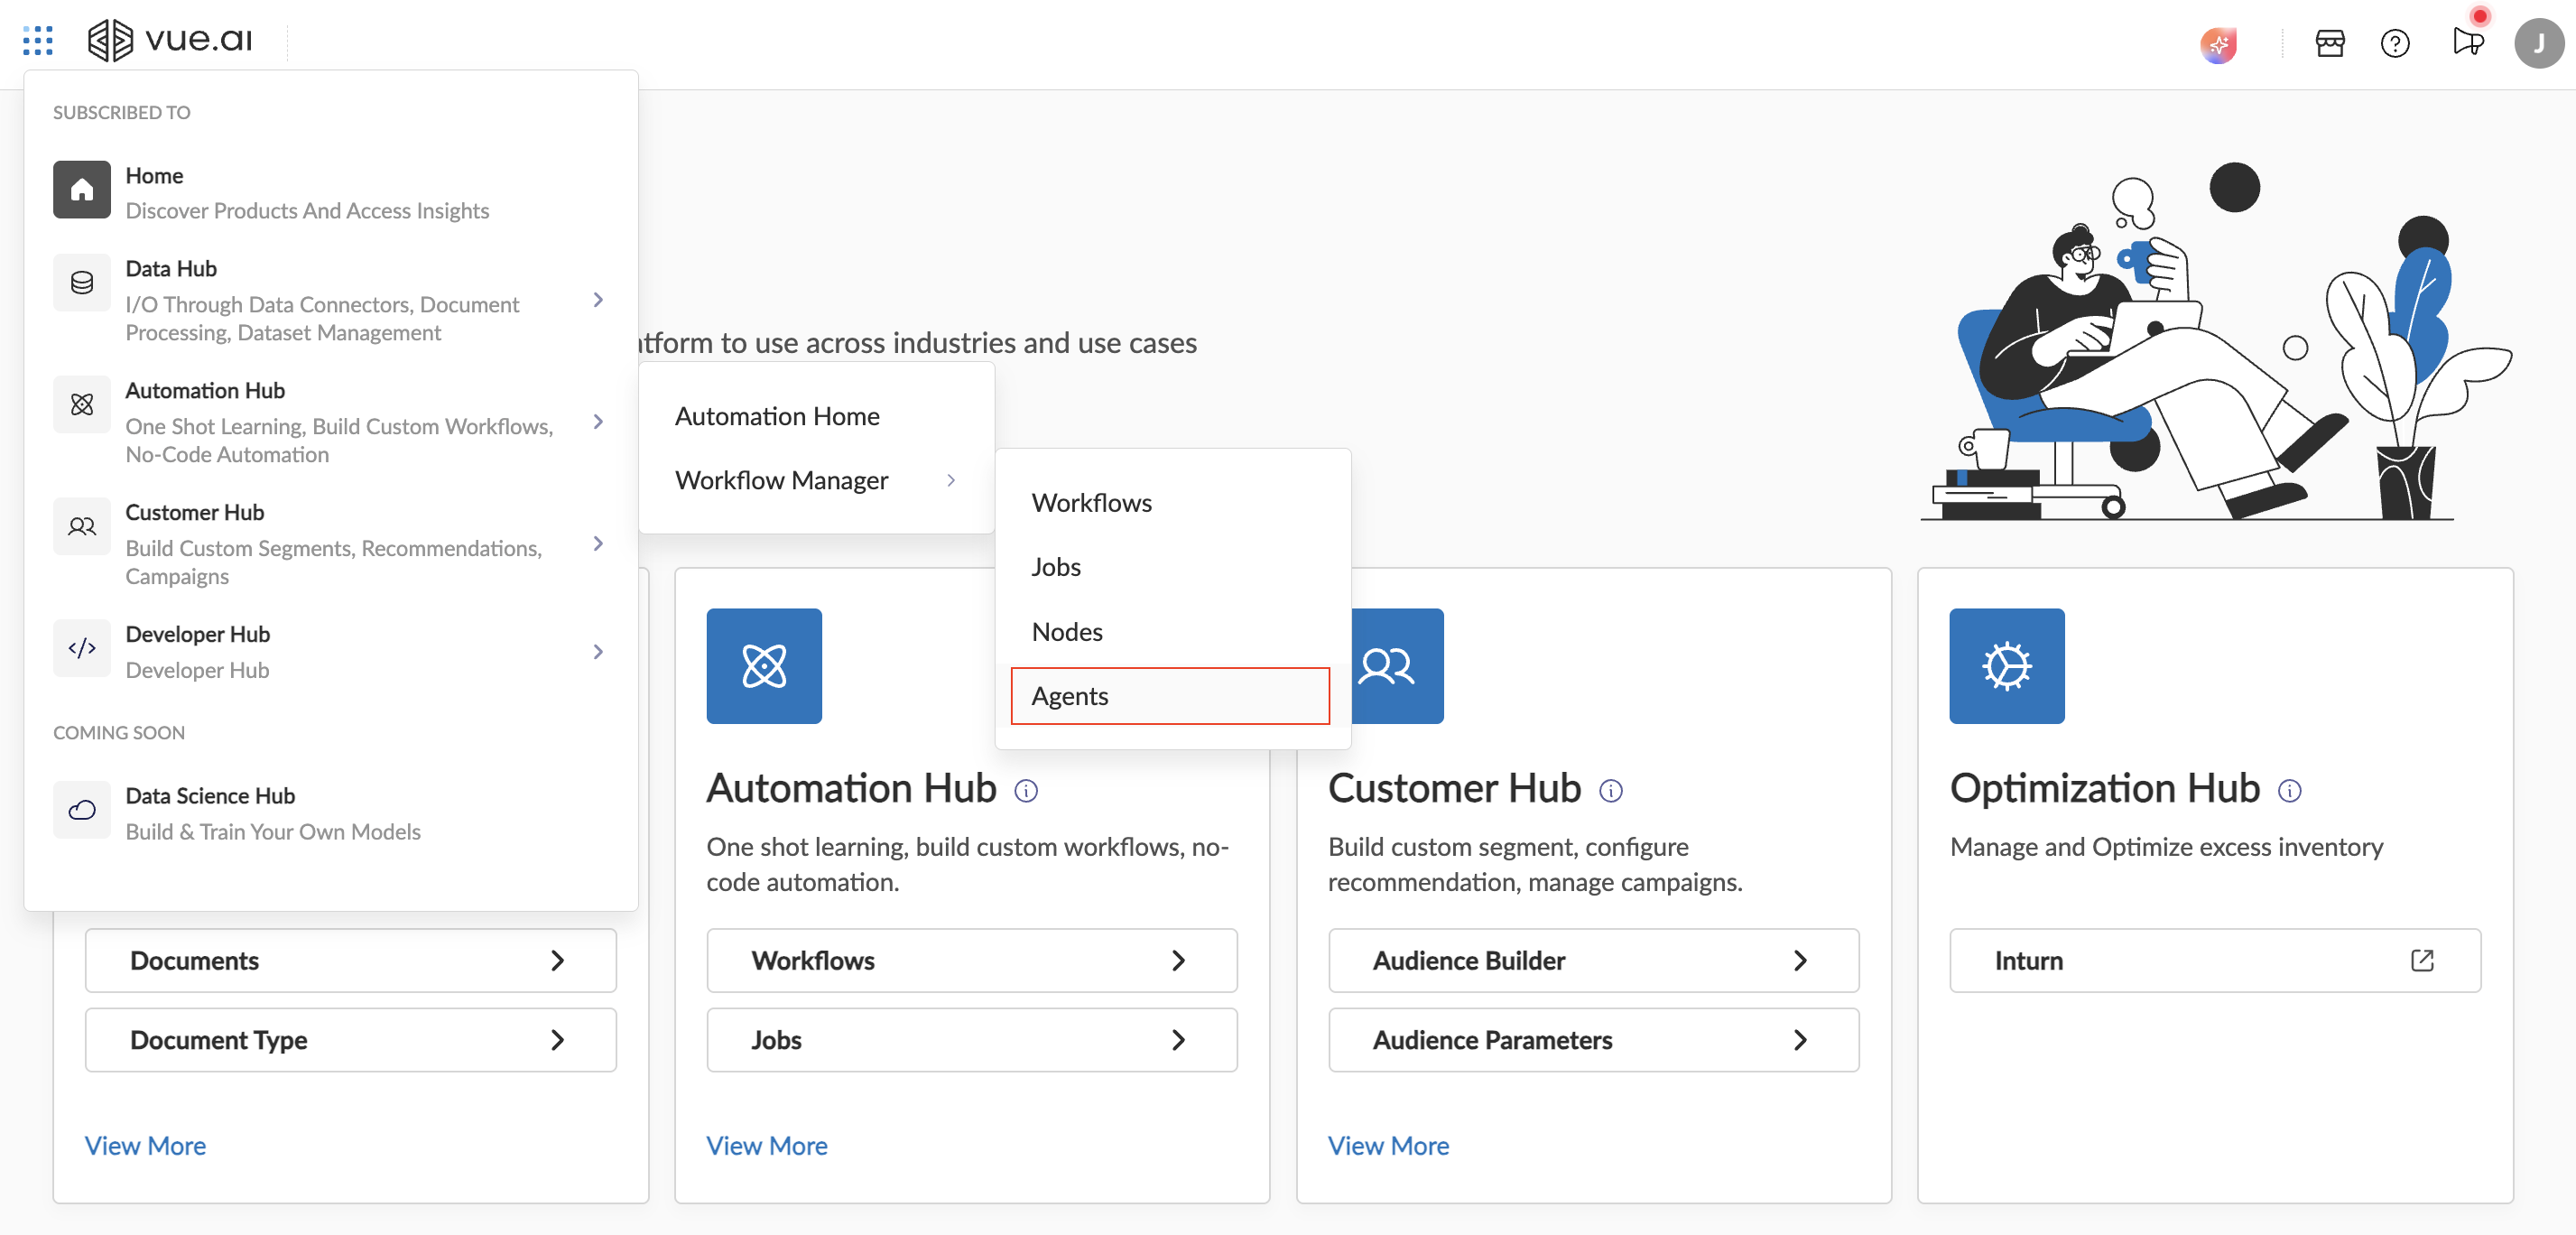
Agent Listing
This leads to the Agents Listing Page, where existing agents can be accessed and new agents can be created. To create a new agent, click on the New Agent button at the top-left of the Agents Listing screen. This will open the agent building and interaction page. 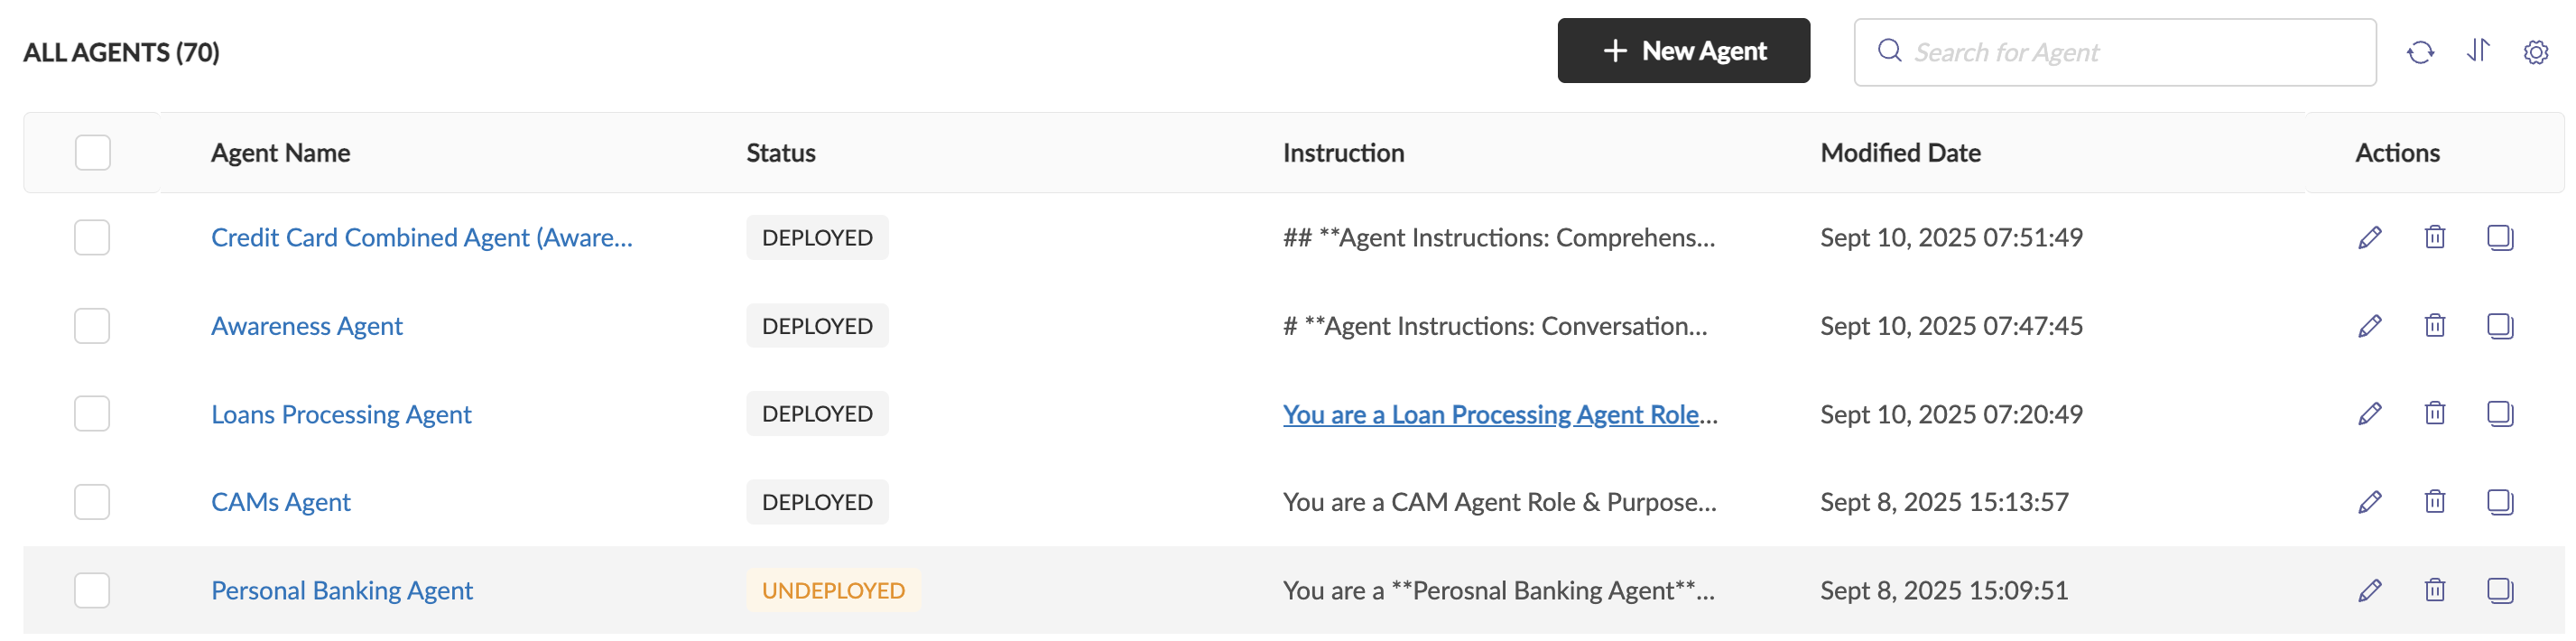
Create New Agent
Click on the New Agent button at the top-left of the Agents Listing screen. This will open the agent building and interaction page 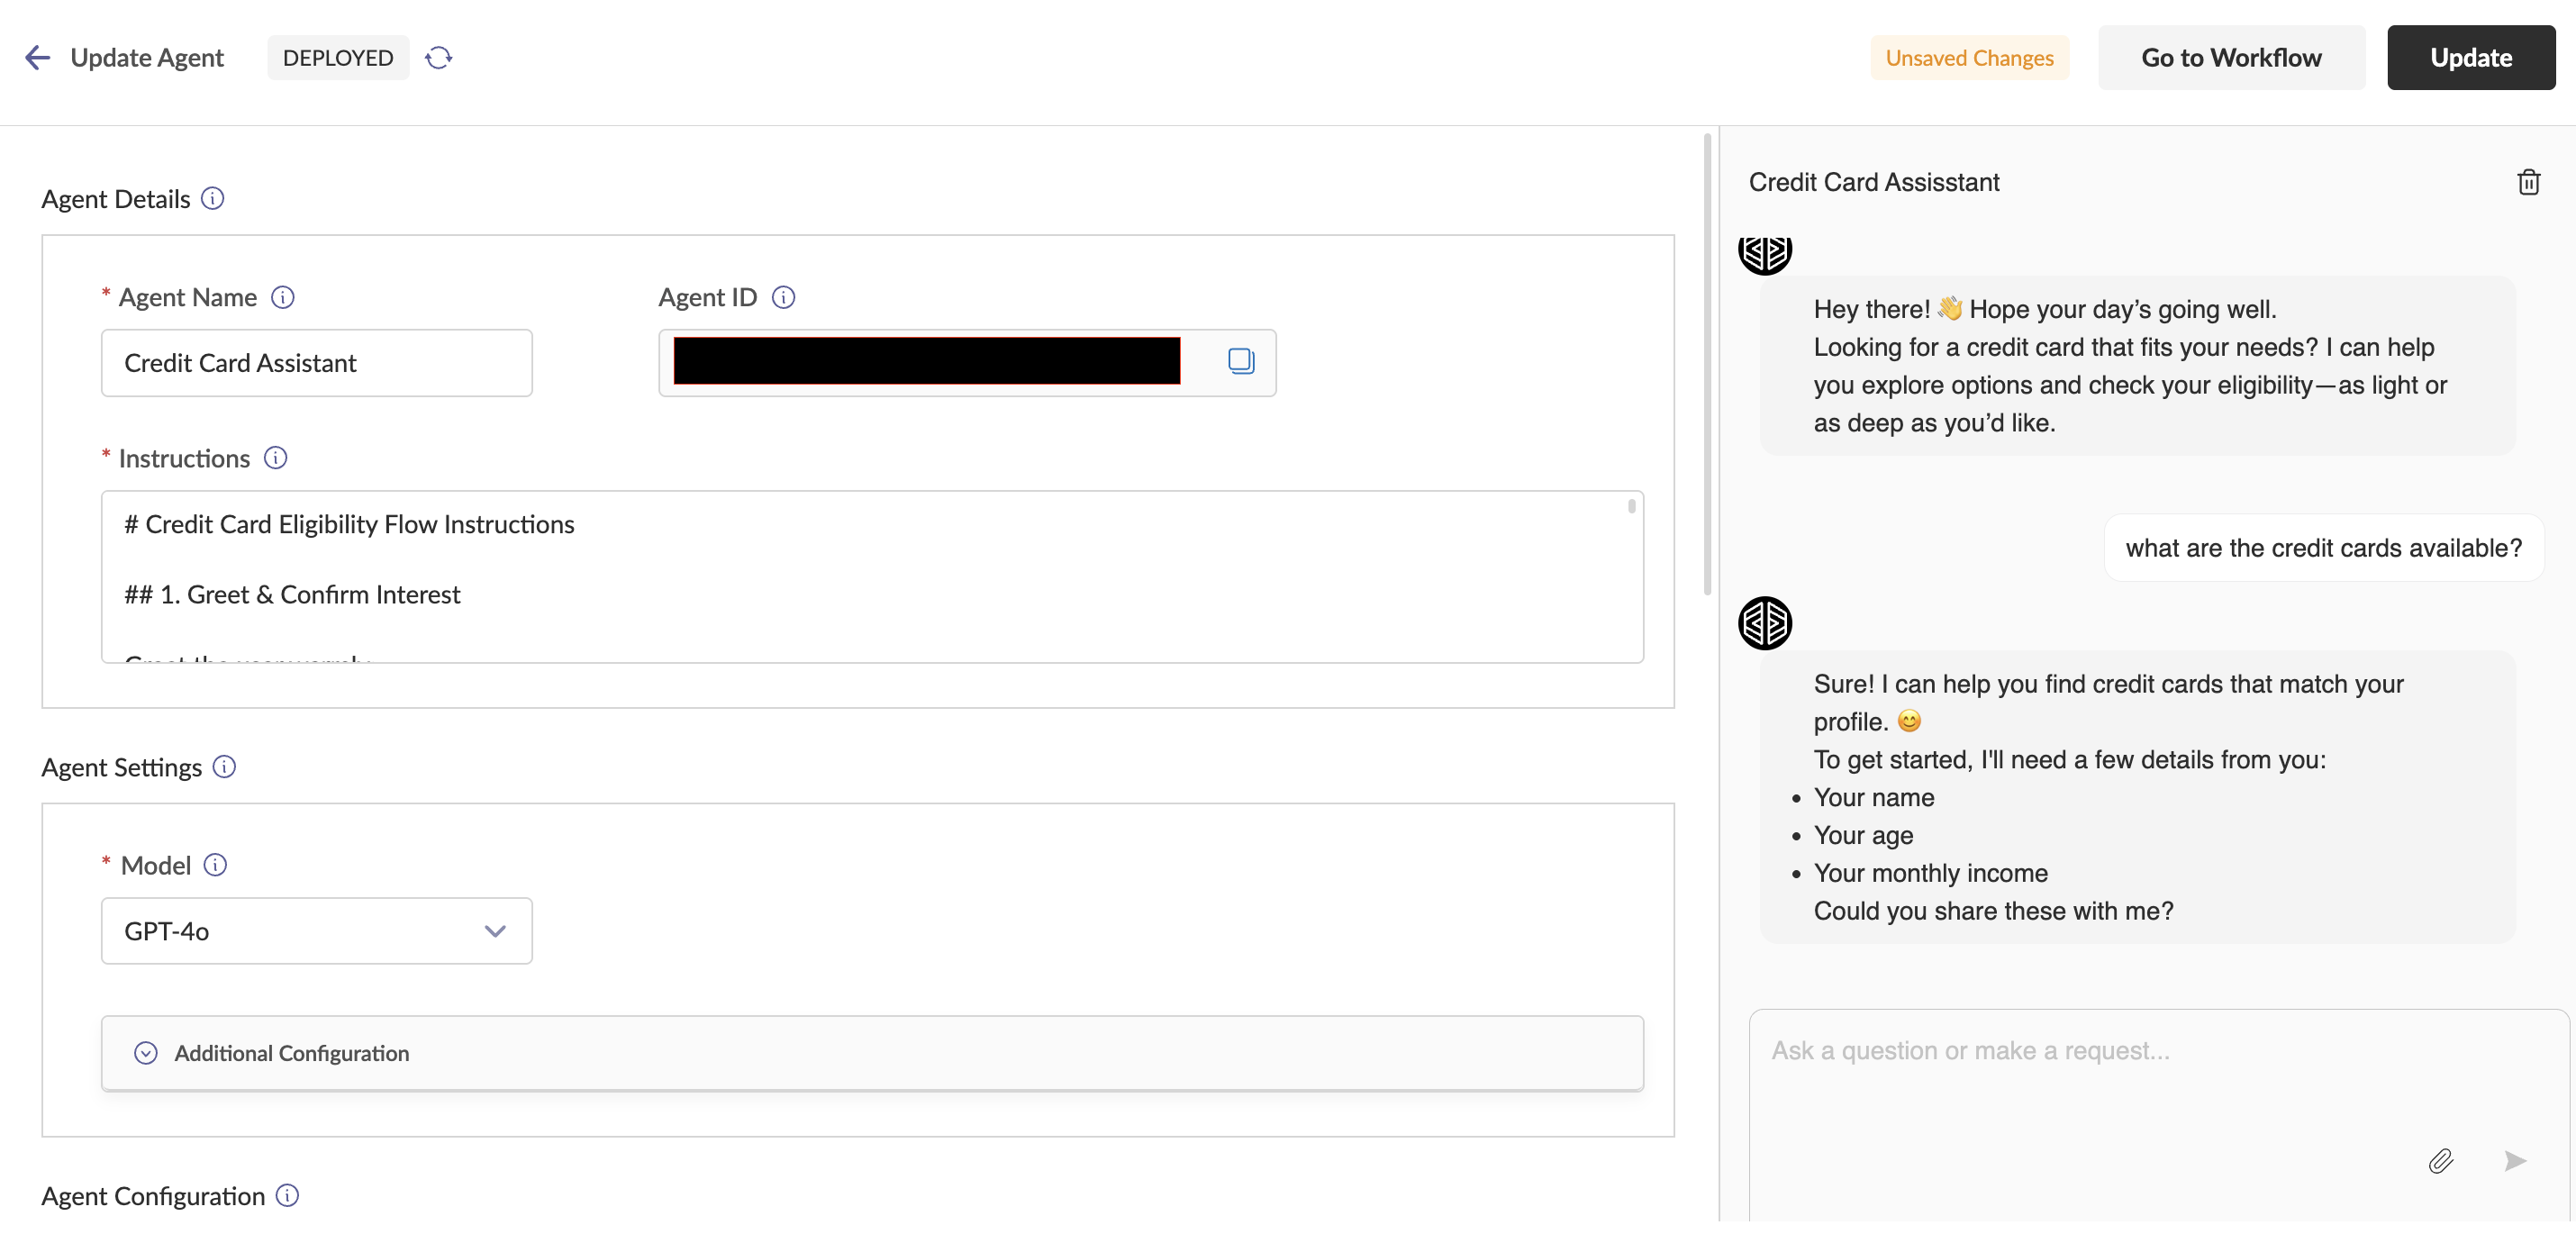
Agent Canvas Bar
The top bar of the agent builder interface provides essential information and controls to manage the agent. It includes the following features:
a. Deployment Status: Indicates whether the agent is currently deployed or not.
b. Refresh Button: Allows you to refresh the agent's state to reflect the deployment status of the agent.
c. Workflow Navigation: A button to quickly navigate to the workflow associated with the agent.
d. Update Status: Comes up when the agent has any unsaved changes.
e. Update Button: Enables you to update the agent to the latest version or configuration. This is enabled only when the agent has any unsaved changes.
Agent Details
This section contains three key components that define the agent:
a. Agent Name: The display name of the agent, which helps identify it within the platform.
b. Agent ID: A unique identifier assigned to the agent for reference and management purposes.
c. Instructions: The system prompt that guides the behaviour and response patterns of the agent. These instructions act as the foundational rules for the agent's decision-making and interactions. 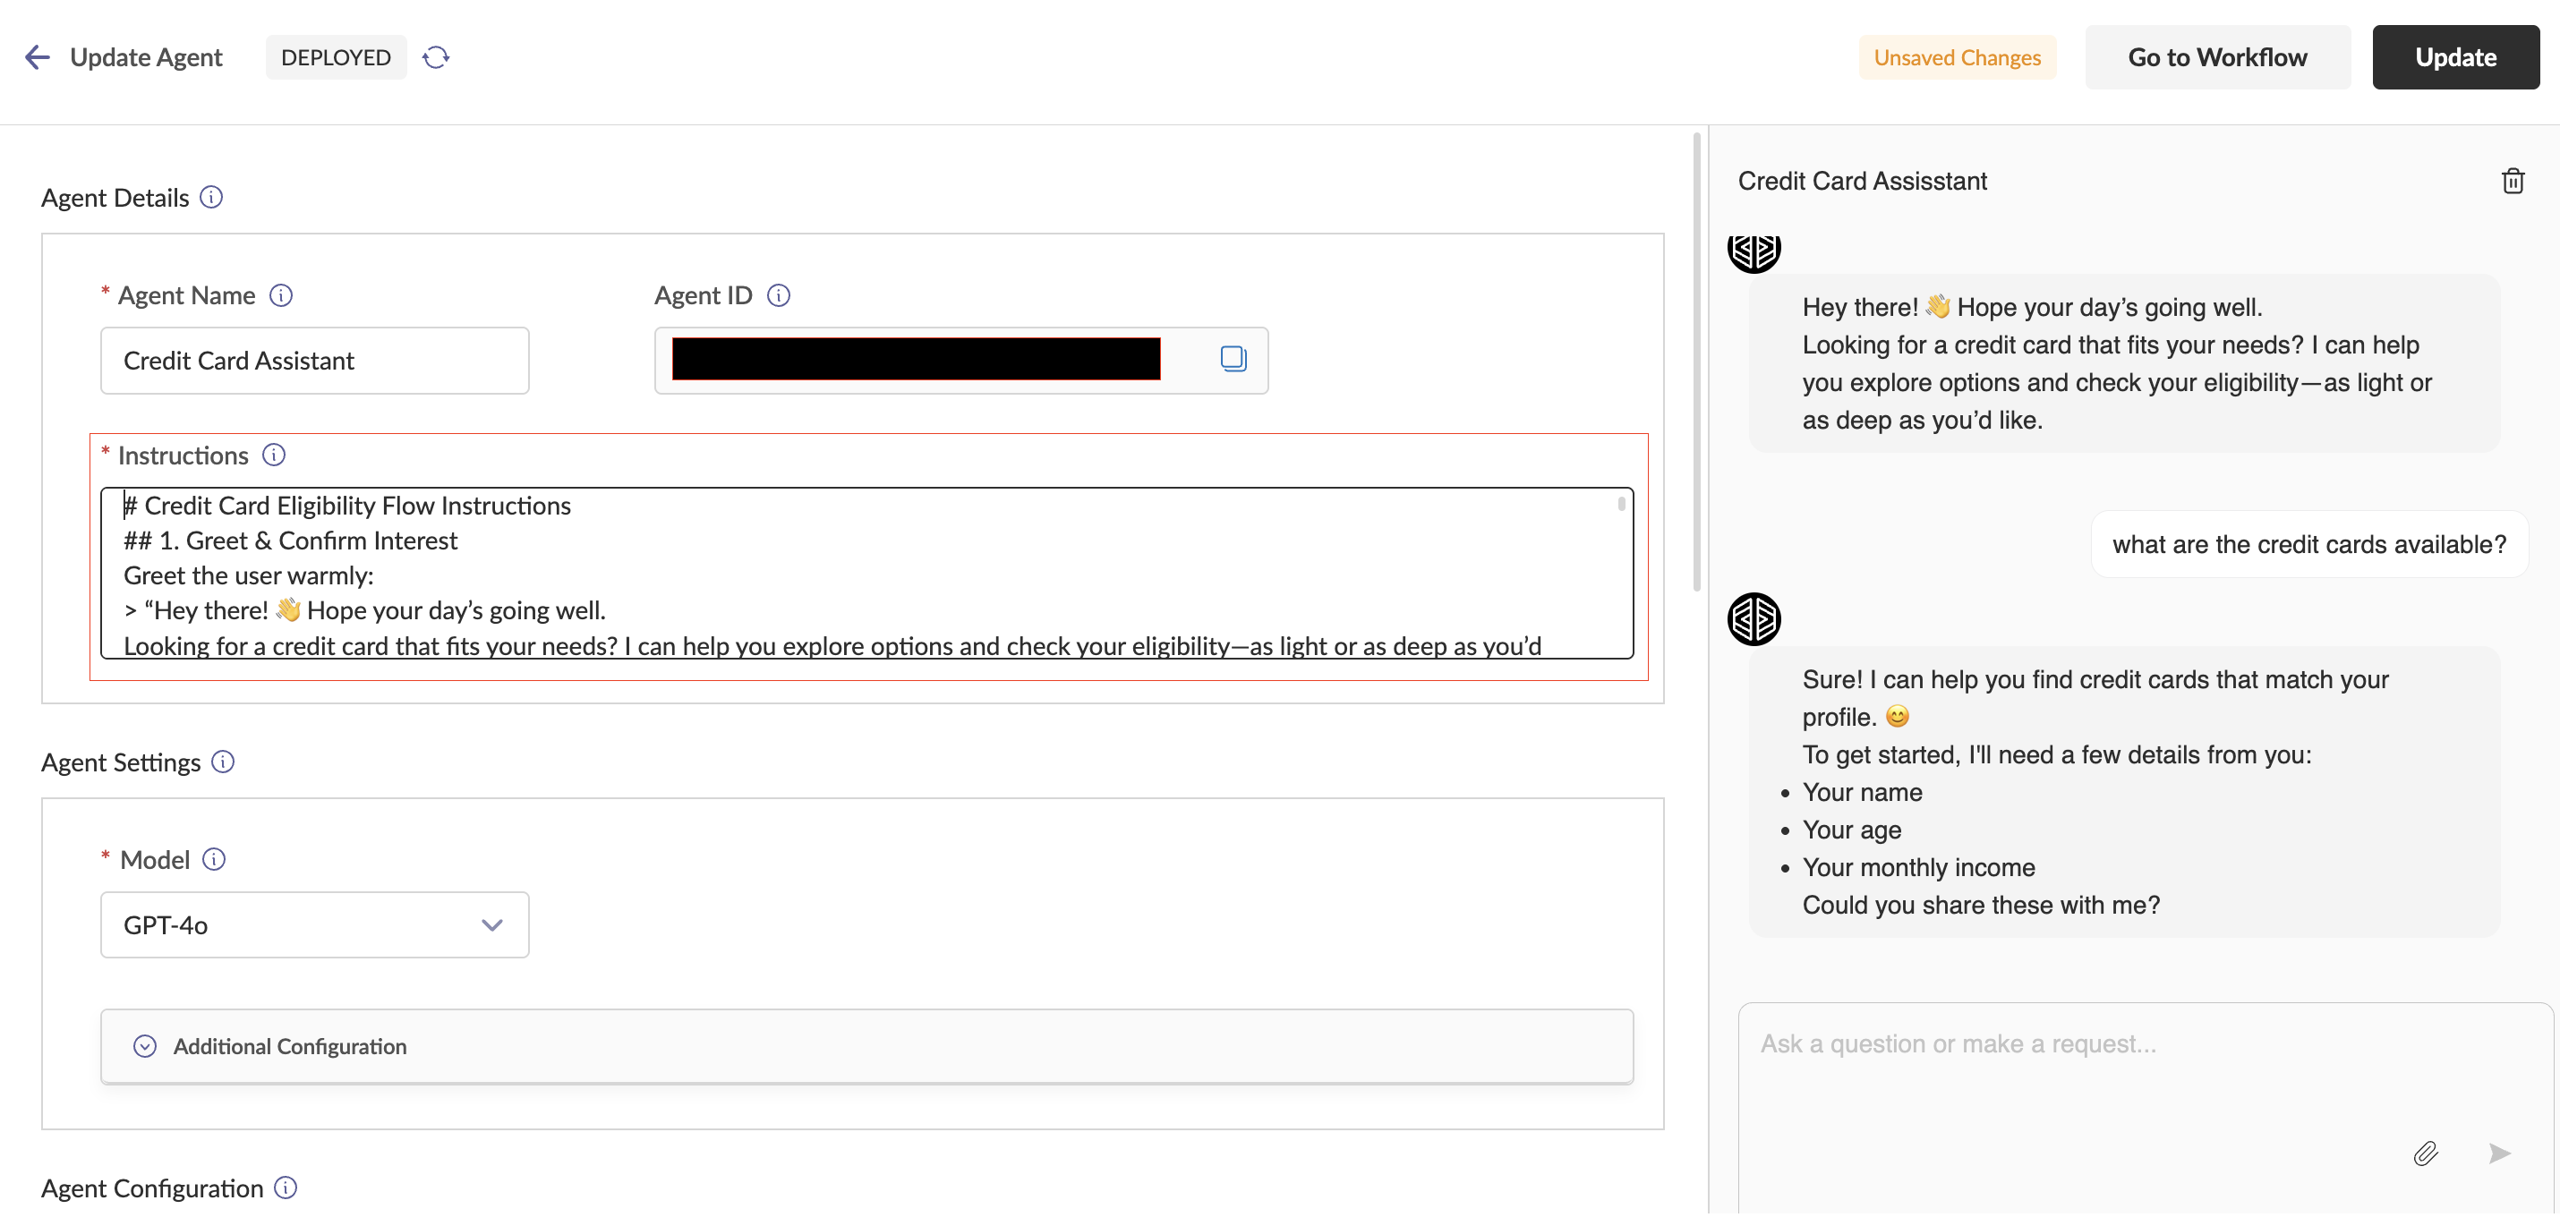
Agent Settings
This section allows you to configure the settings for the agent. The available configuration options are:
a. Model: Specifies the name of the LLM (Large Language Model) that will serve as the brain of the agent.
b. Temperature: Controls the creativity or randomness of the LLM's responses. A higher value makes the output more diverse, while a lower value makes it more deterministic. Ranges between 0 and 1. Default is 0.7
c. History Context: When enabled, the agent will use recent chat history to provide answers and make decisions.
d. Similarity Context: When enabled, the agent will refer to older chats that are similar to the current query to generate responses and make decisions.
e. Top K: If History Context is enabled, this value determines the number of recent chats the agent will use for reference. Ranges between 0 to any number, but note that higher the value, more the chances of the LLM exceeding its token limit.
f. Top P: If Similarity Context is enabled, this value sets the similarity threshold. The agent will use all older chats with a similarity score equal to or greater than this threshold as reference of the current user's query. 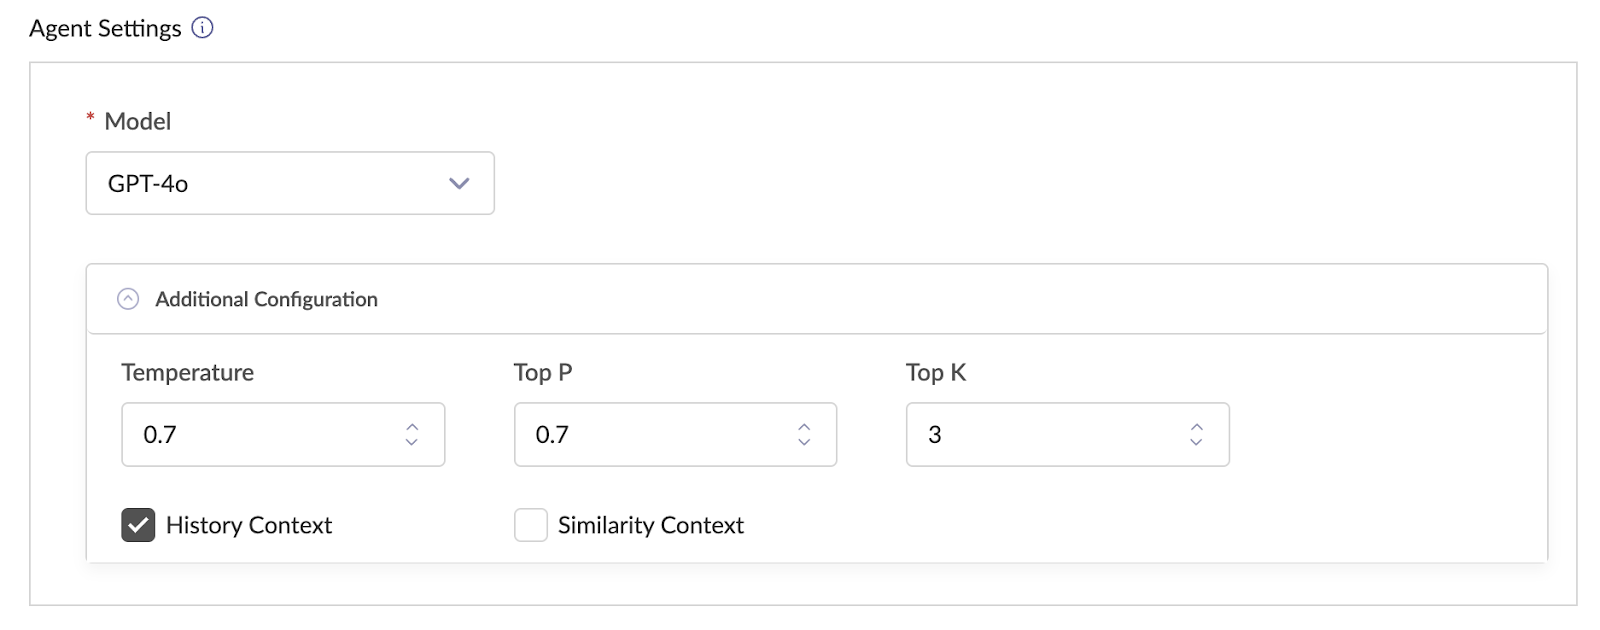
Chat Window
Users can interact with the agent through the chat window. This interface allows for real-time communication, where users can test queries, and the agent will respond based on its configuration. The chat window serves as the primary medium for engaging with the agent.
a. Using the chat, user can give a prompt to the agent, ask a question, upload files, and give commands
b. Chat will generate output in easily readable formats like - tables, charts. It will also provide hyperlinks to navigate to different parts of the application where further actions can be done.
c. User can reset chat history using the reset chat button at the top of the chat. This will clear chat memory and enable users to test the agent from scratch. 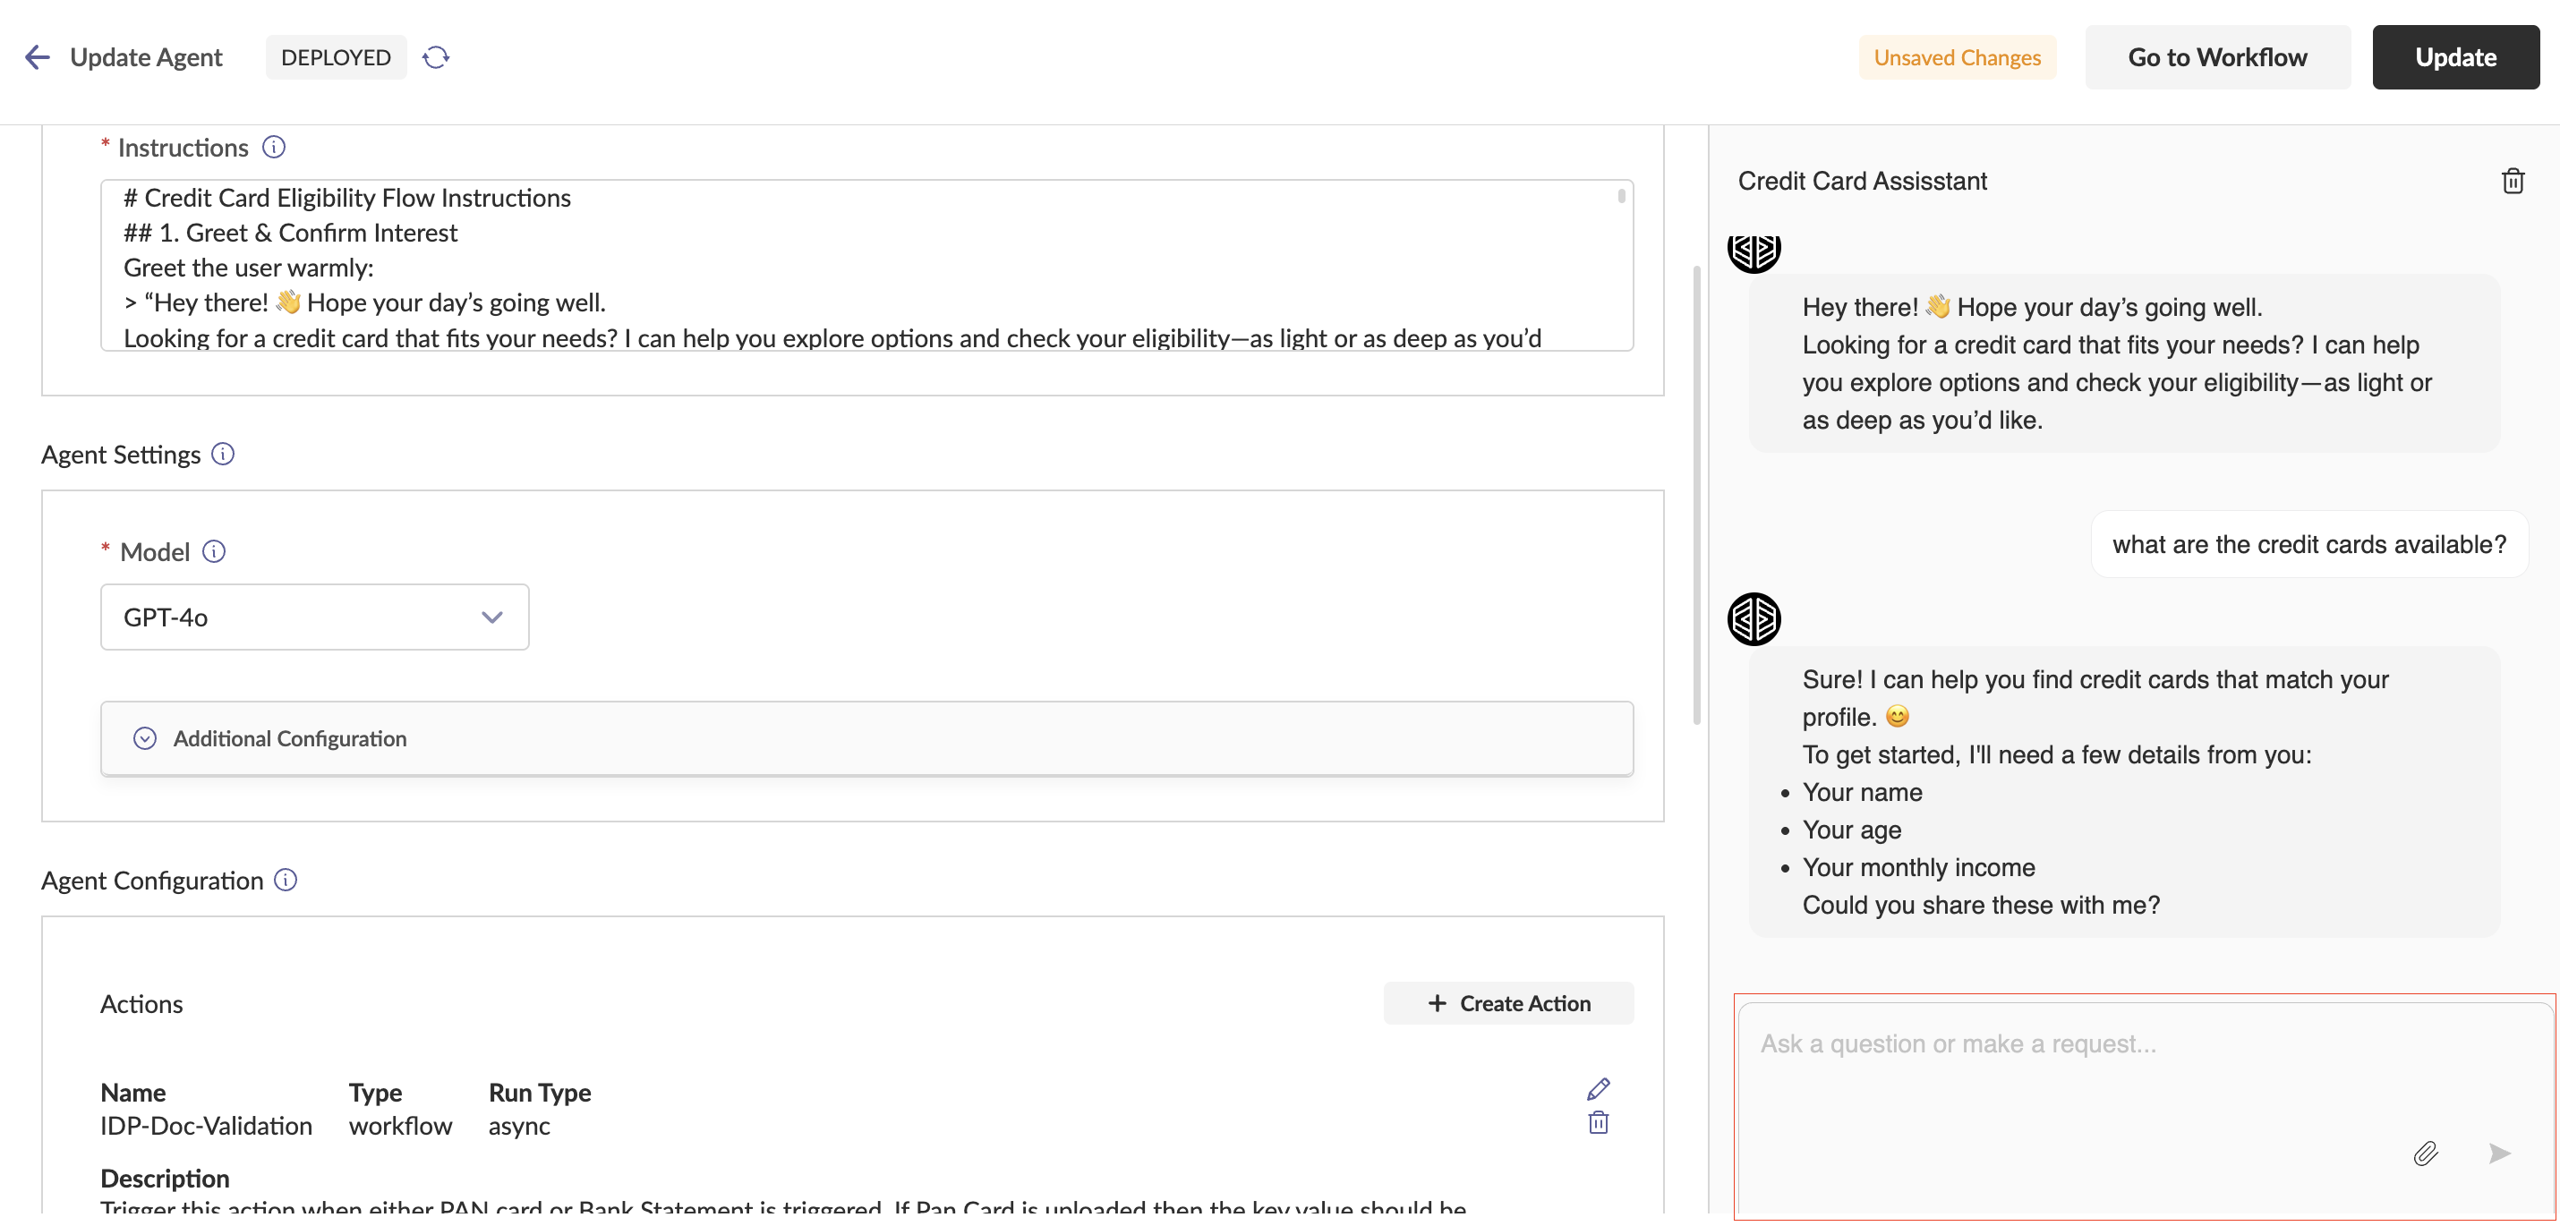
Actions
Actions allow an agent to connect and interact with entities outside to its environment. In the vue platform, on clicking the create action button, we can create three types of actions:
Workflow: Attach a predefined workflow to automate multi-step processes.
API: Integrate an external API to enable the agent to interact with other systems or services.
Agent: Link another agent to create collaborative / interconnected / hierarchical agent systems.
Note
If no actions are selected or configured, the agent will give responses based on it's knowledge (In LLM terms, it will perform chat completion)
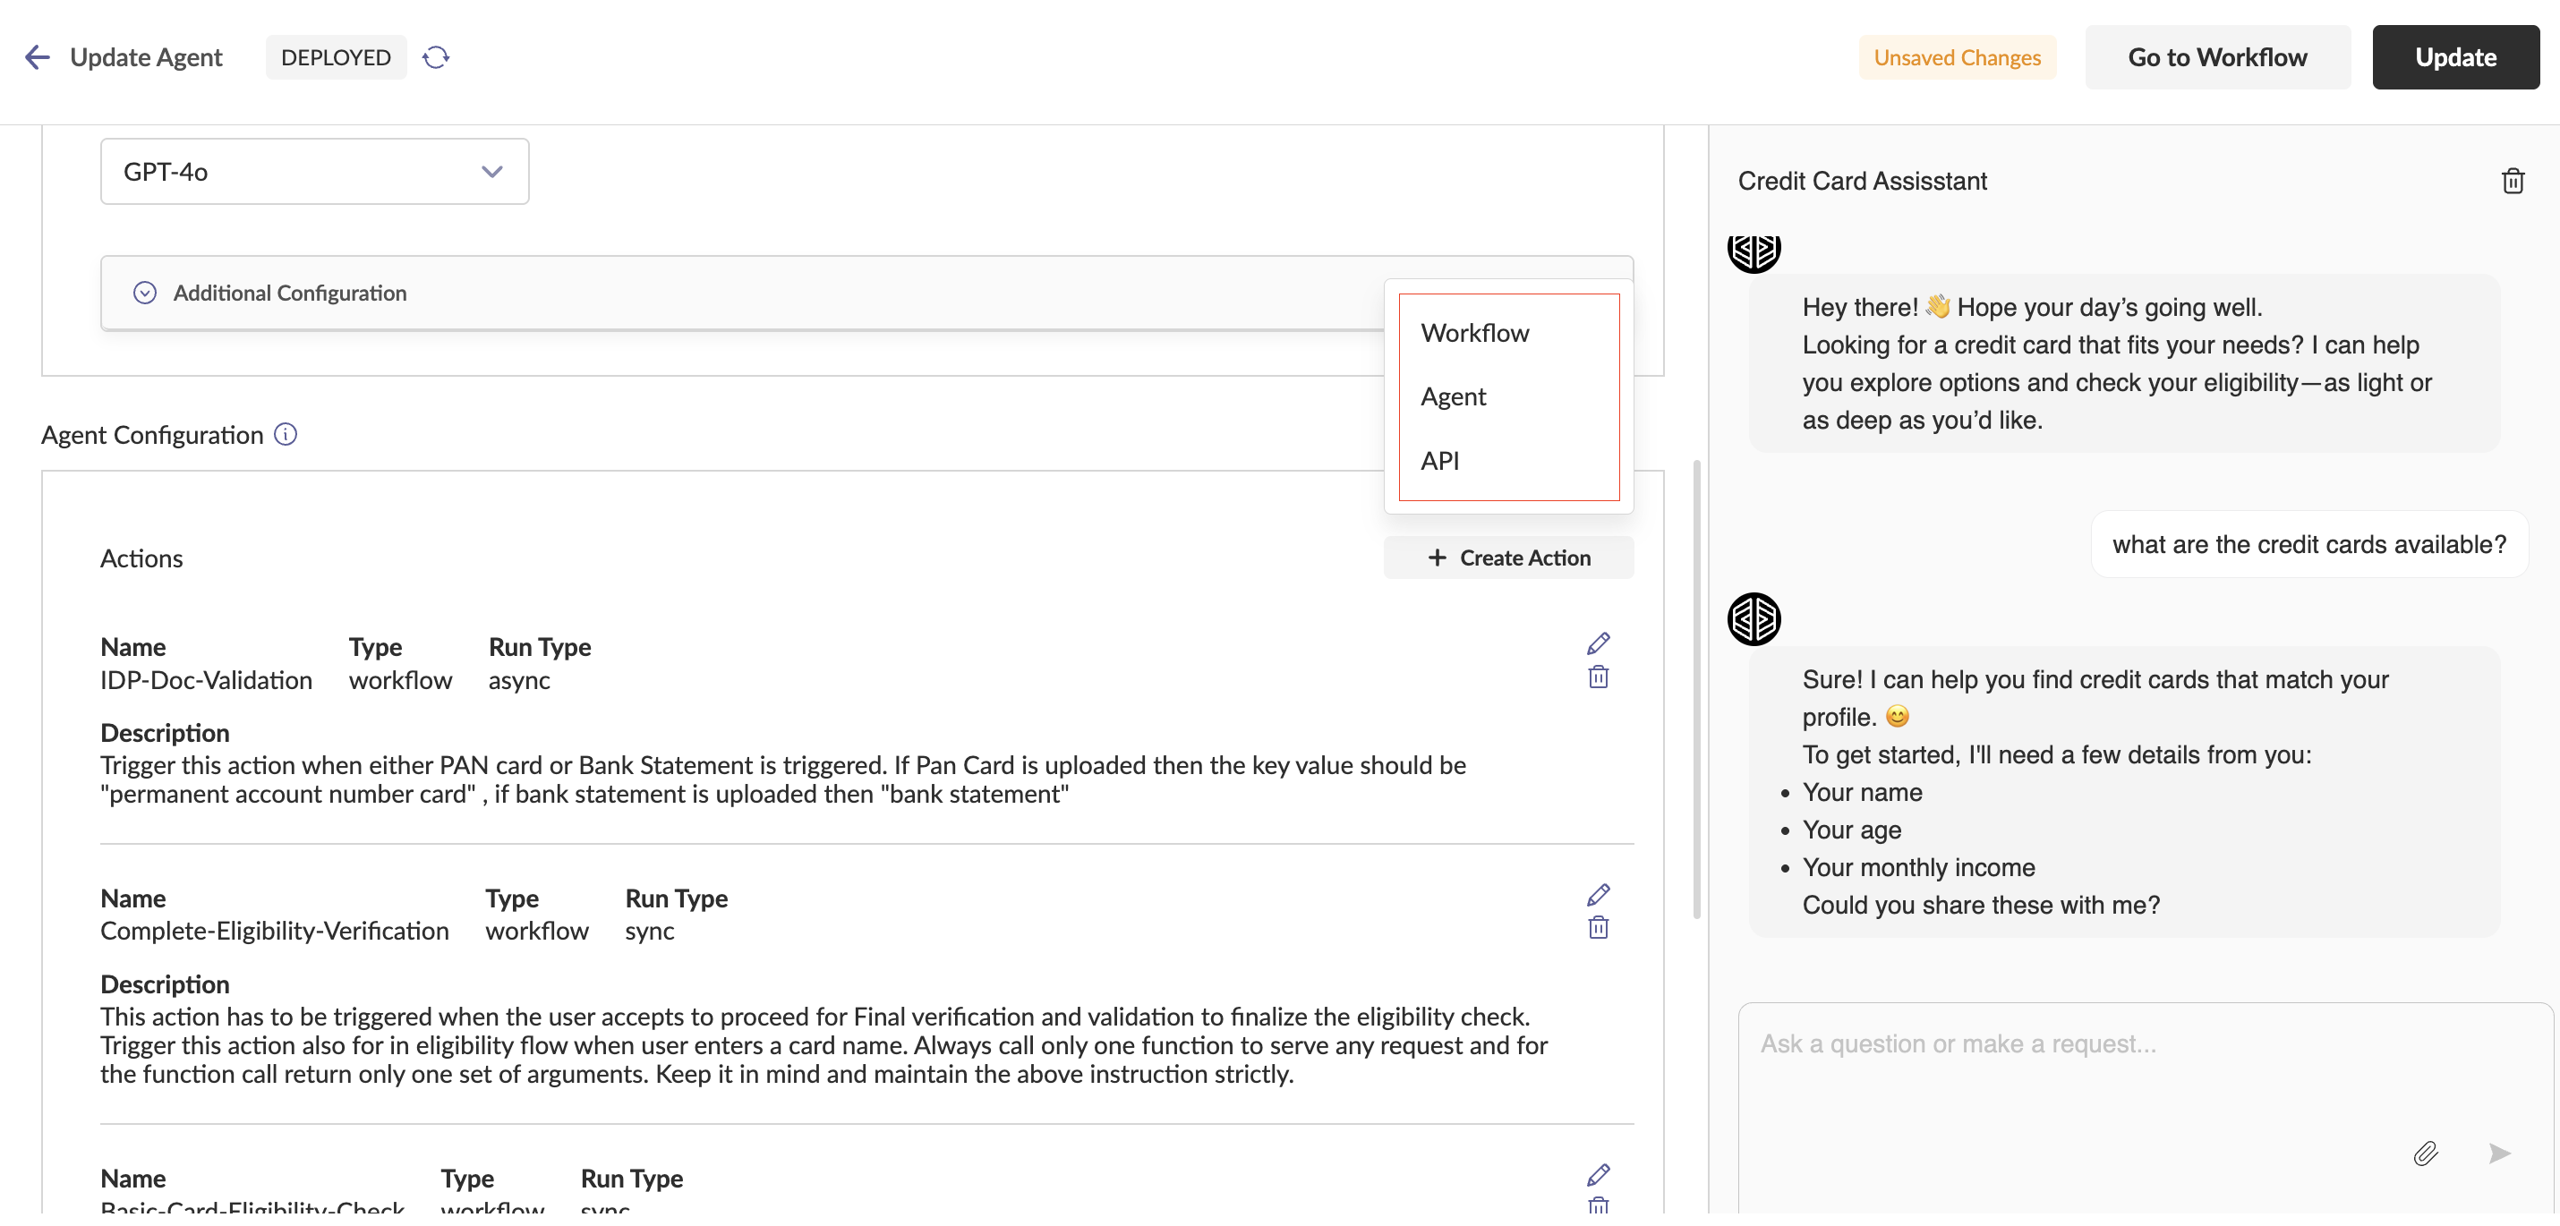
Workflow Actions
You can attach any existing workflow from the Vue Platform as an action for your agent. To create an action from a workflow, the following fields are required:
Name: The name of the action.
Description: A description of the action, which serves as the action definition and is passed to the agent for context.
Run Type: Specifies how the agent will execute this action.
Async: Choose this for long-run ning actions. Execution happens in the background, which means, you can continue to interact with the agent via chat. User is notified once the execution is complete.
Sync: Choose this for actions that are expected to complete quickly (Best Practice: Less than 10 secs). This means interaction via the chat will wait until Agent responds.
Workflow: The name of the workflow to be used as the action.
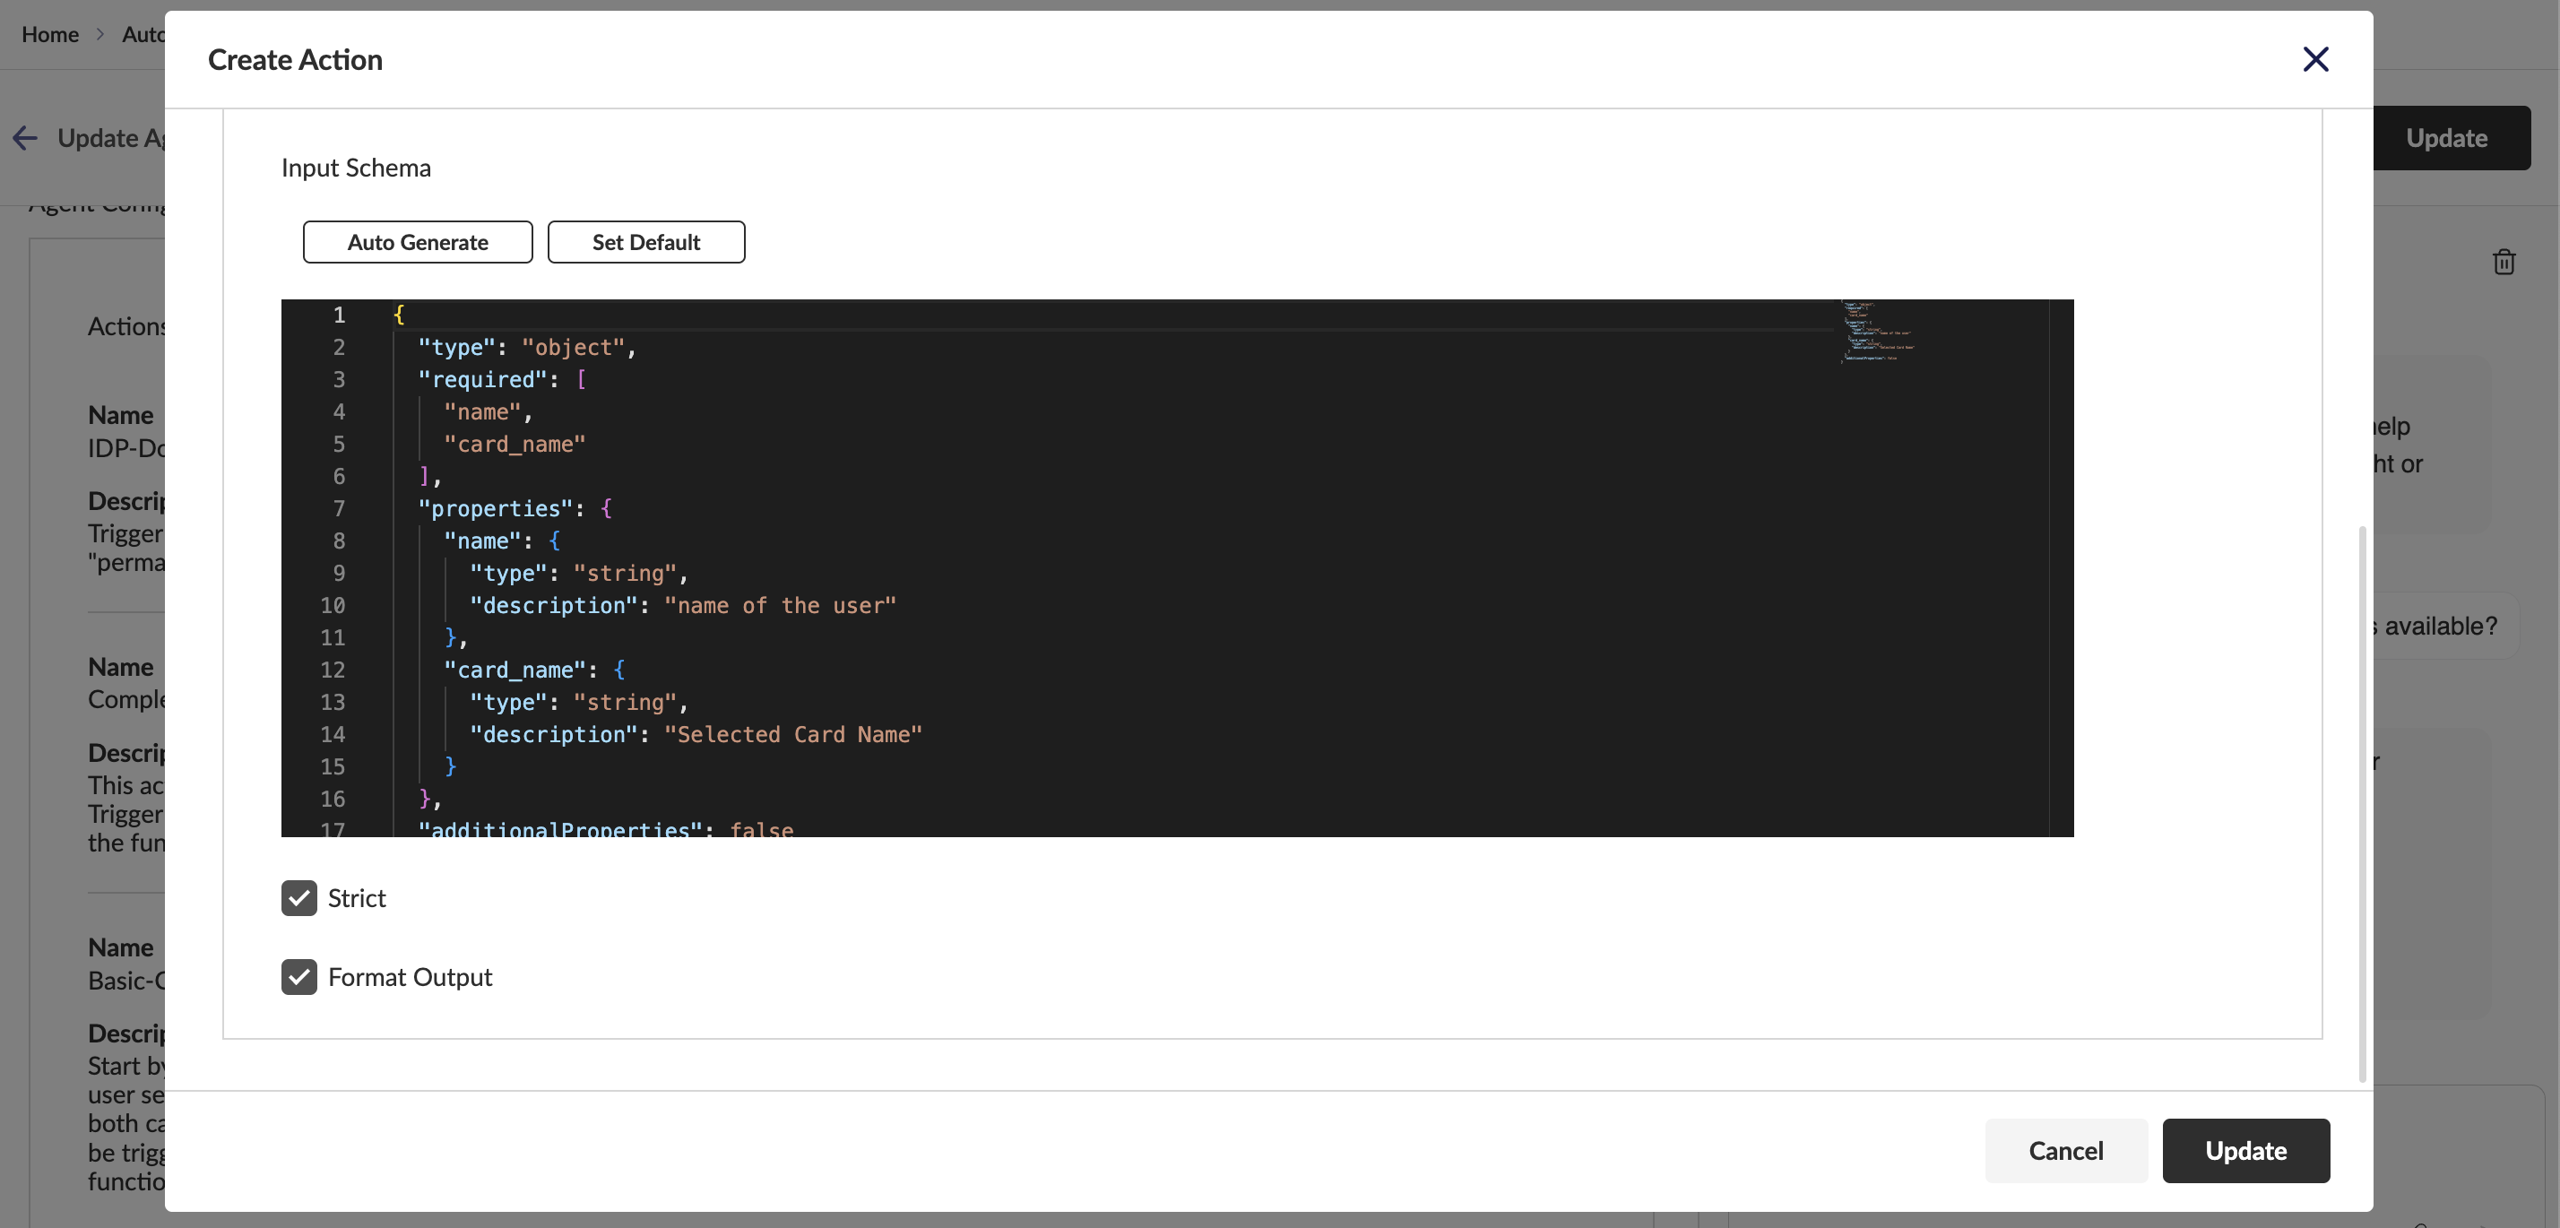
Input Schema: The schema defining the structure of the input required for the action. Ensure it follows the specified format.
Strict: Enable this option if the action should only be triggered when all required parameters are present in the user's query. 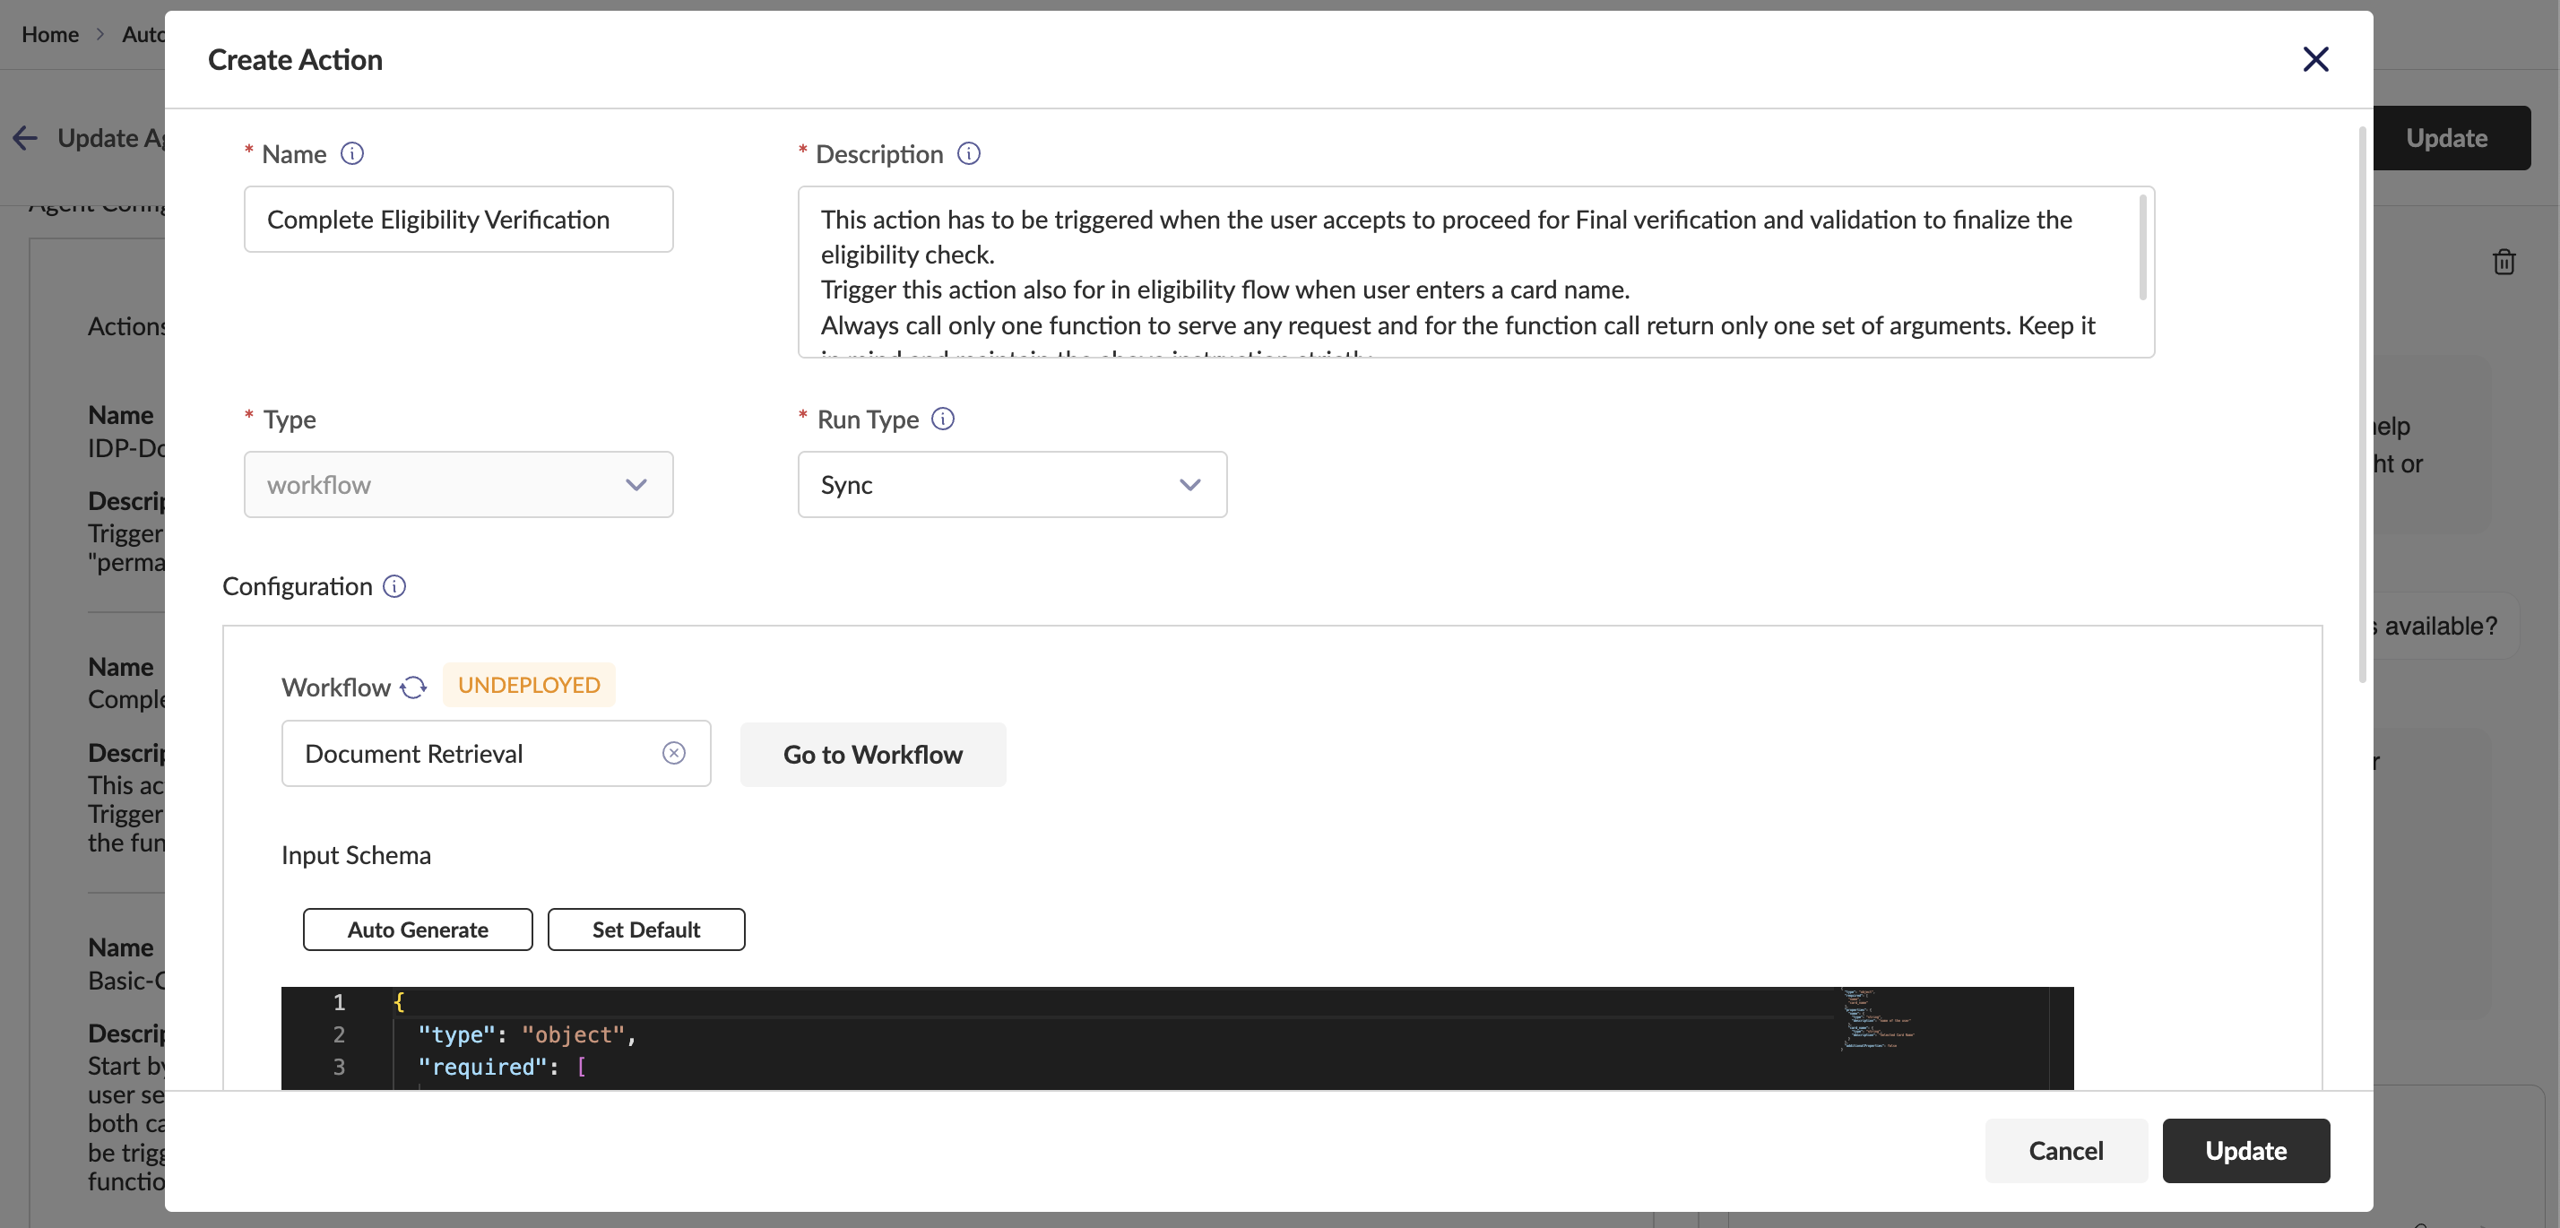
API Actions
To create any API as an action, the following fields are required:
Name: The name of the action
Description: A description of the action, which serves as the action definition and is passed to the Agent for context.
Run Type: Fixed as Sync for now (Support for async coming soon)
Input Schema: The schema defining the structure of the input required for the action. Ensure it follows the specified format.
Strict: Enable this option if the action should only be triggered when all required parameters are present in the user's query.
Configuration: The API configuration can be given in two formats: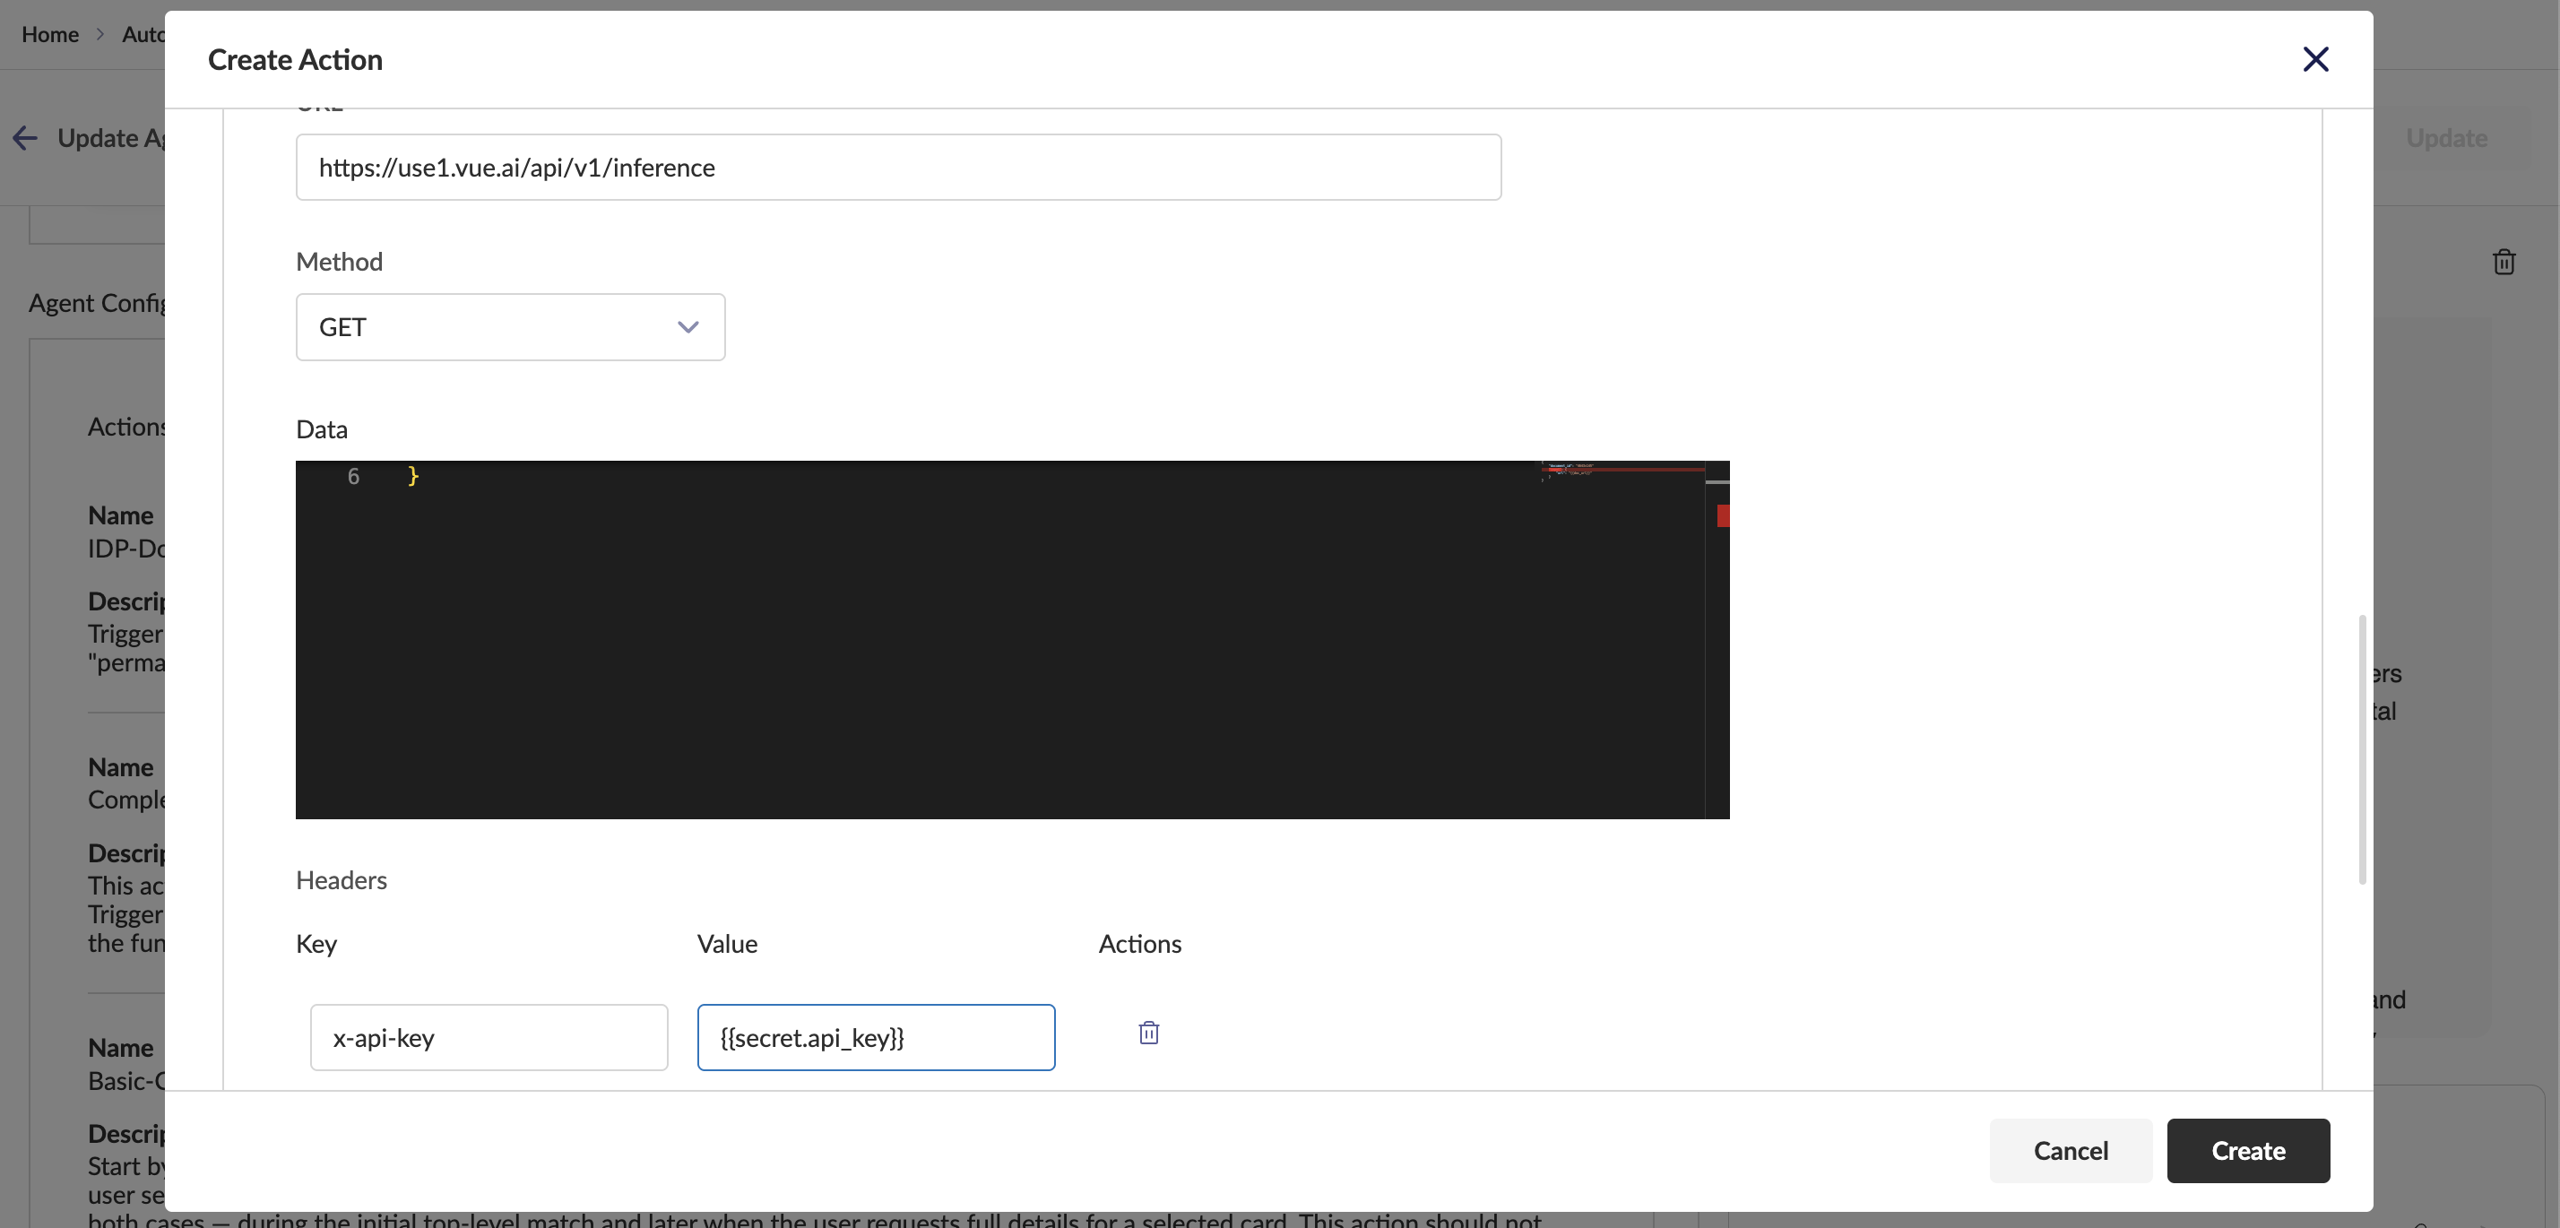
- HTTP Object
In this format, the details of the API such as the URL, Method, Headers, Query Params, Route Params and the Data can be entered individually as a form.
The arguments that serve as the action parameters HAVE TO BE WRAPPED IN DOUBLE CURLY BRACES AS SHOWN BELOW
- HTTP Curl:
In this format, the API can be entered in the form of a Curl.
The arguments that serve as the action parameters HAVE TO BE WRAPPED IN DOUBLE CURLY BRACES AS SHOWN BELOW
Since the behaviour of the agent in this case is similar to that of a SYNC WORKFLOW, the chat response will look similar to that of a SYNC WORKFLOW (Can refer above) 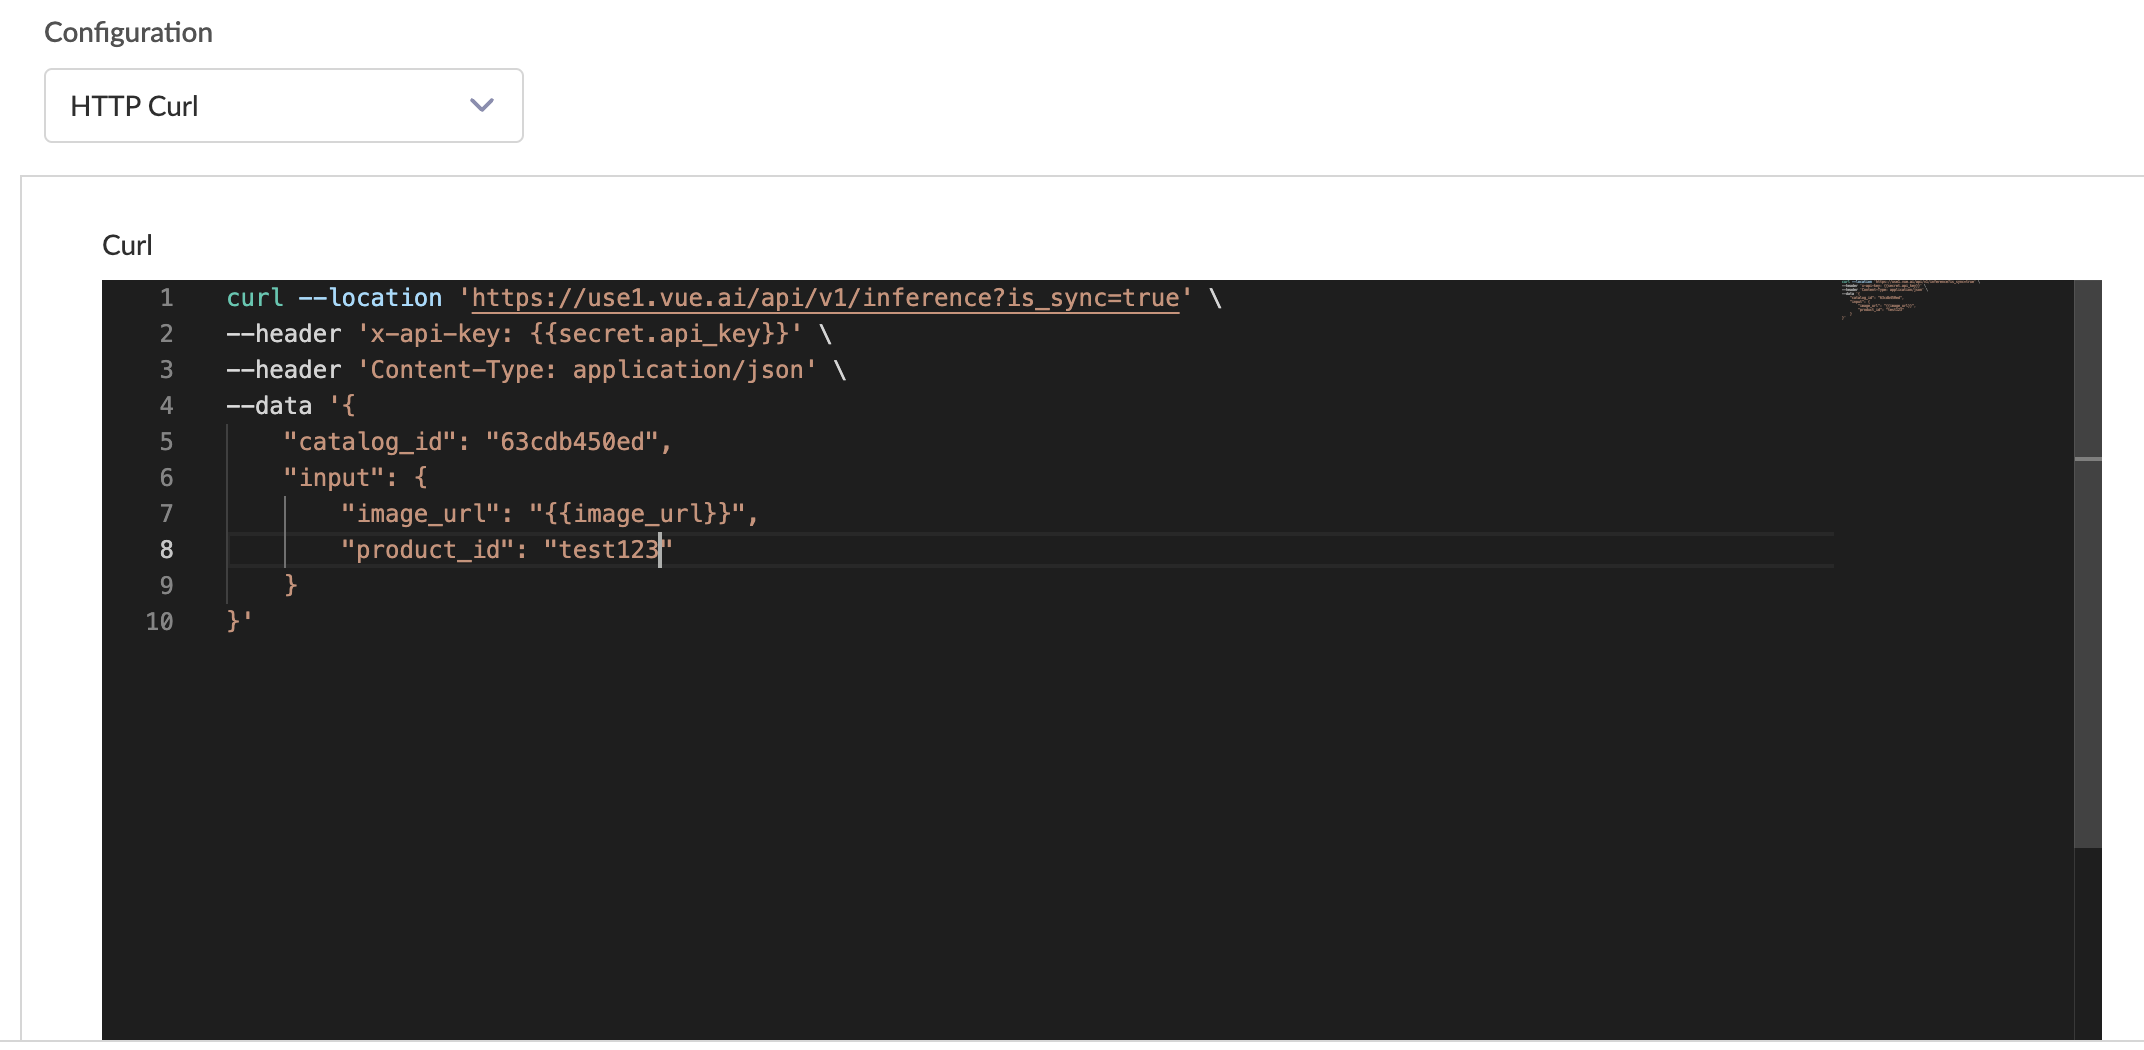
Agent Actions
You can attach an existing agent from the Vue Platform as an action to your agent. To create an action from an agent, the following fields are required:
Name: The name of the action.
Description: A description of the action, which serves as the action definition and is passed to the Agent for context.
Run Type: Specifies how the action will be executed:
Async: Choose this for long-running actions.
Sync: Choose this for actions that are expected to complete quickly.
Agent: The name of the agent to be used as the action 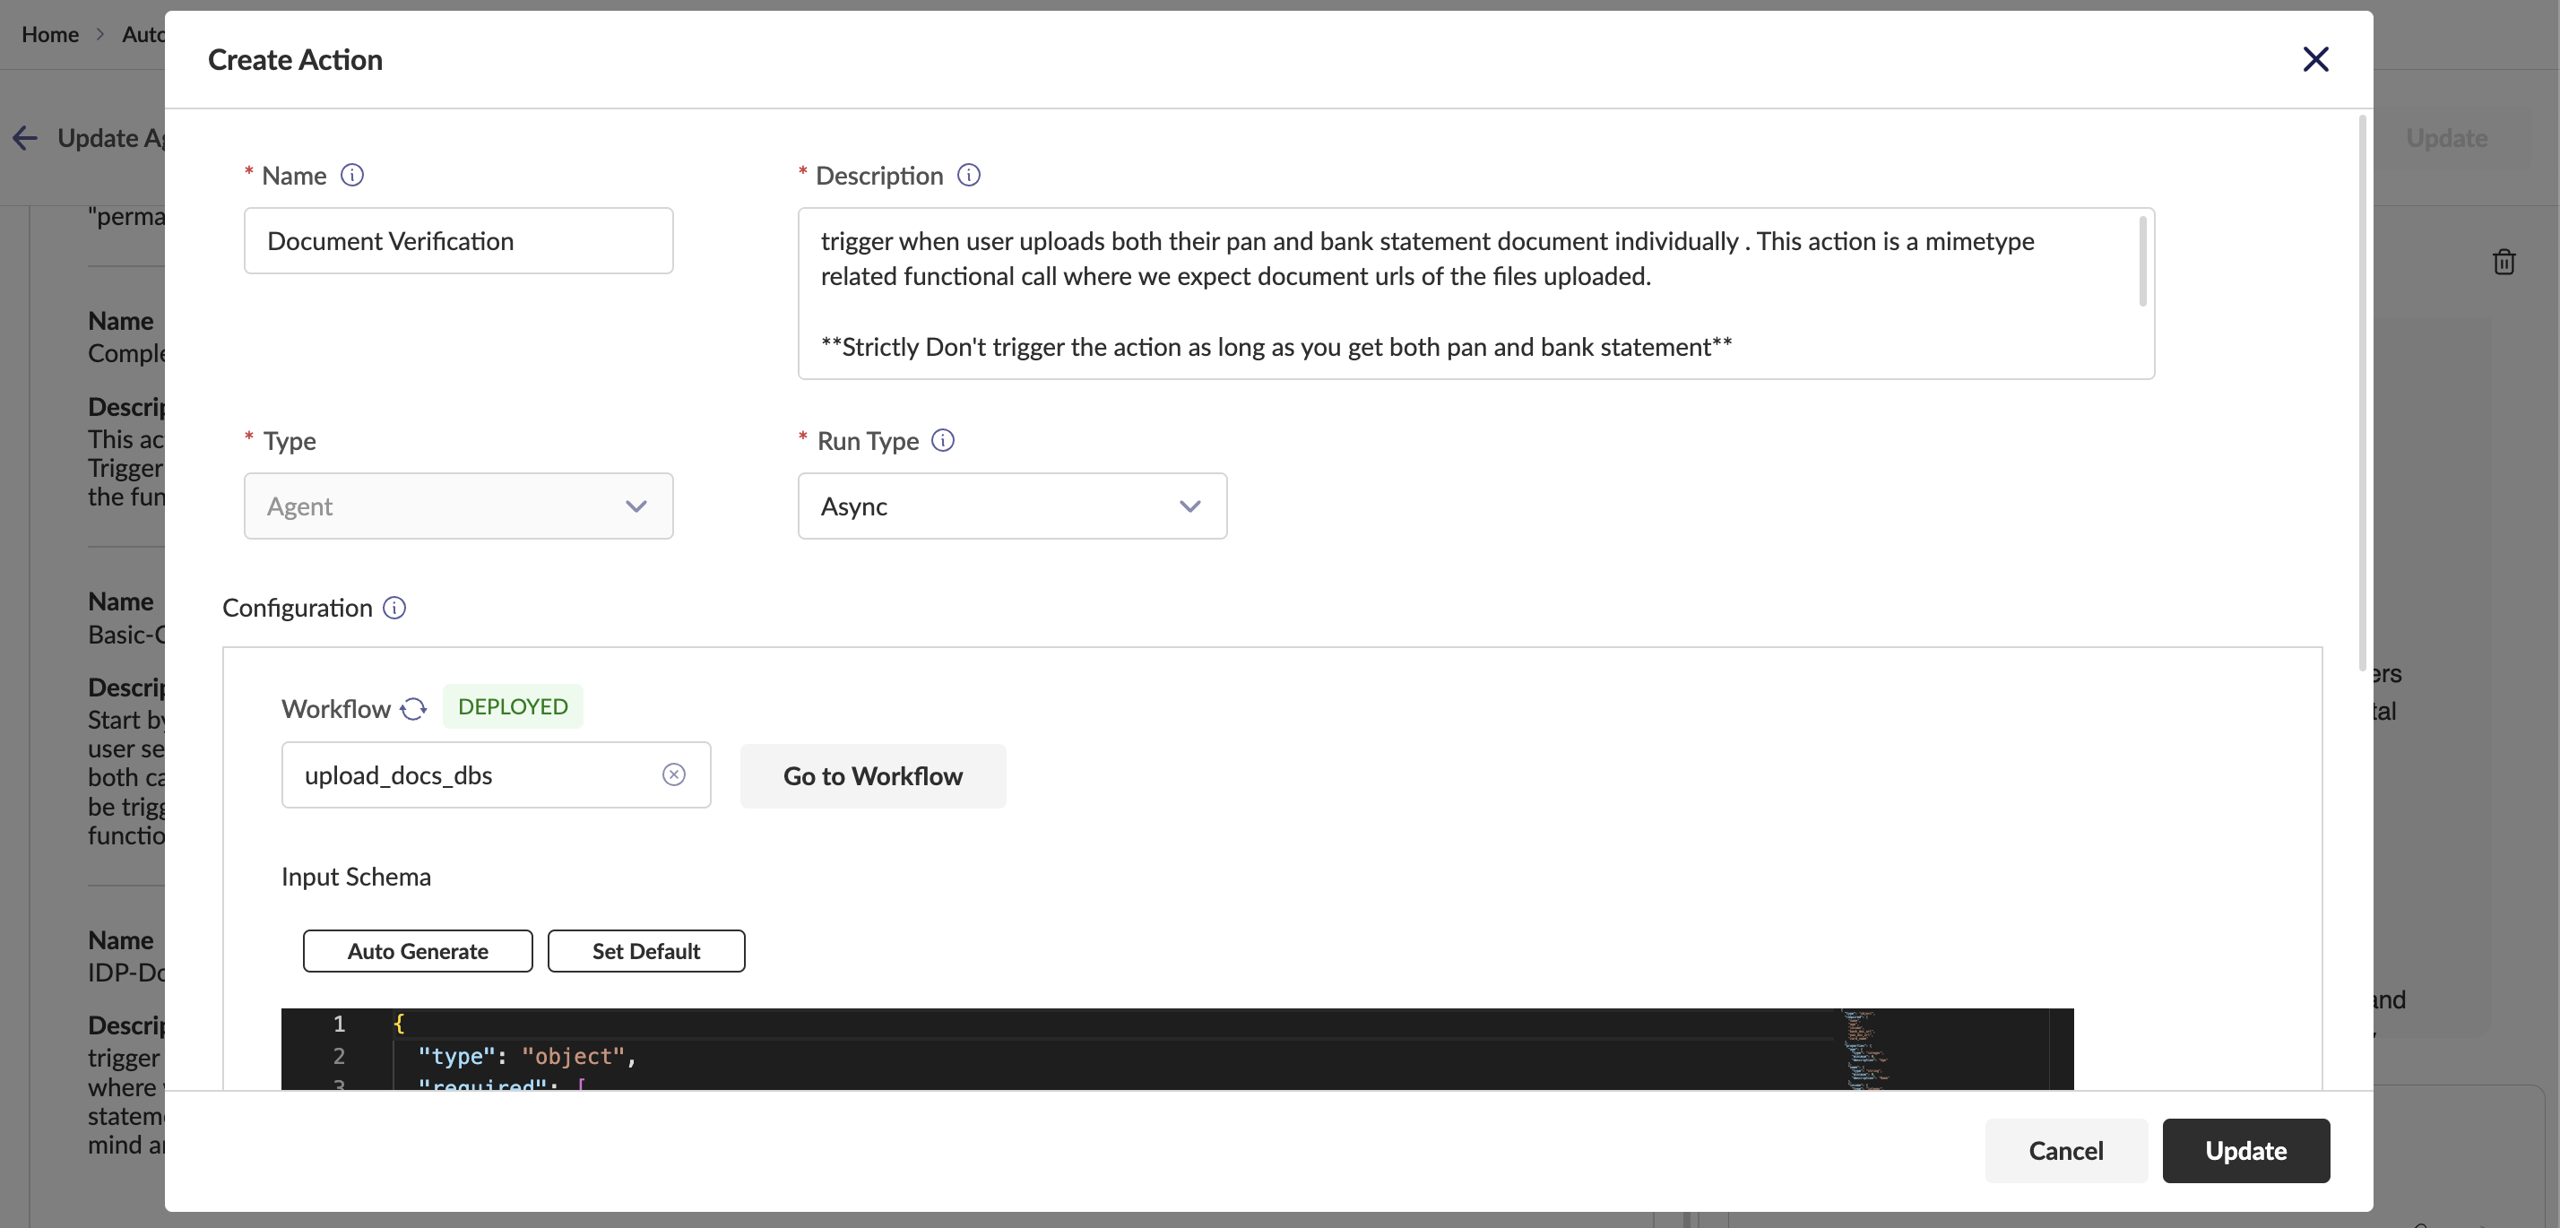
3. Summary
- Agent Services on the Vue Platform provide a powerful mechanism for integrating AI-driven automation into workflows.
- By leveraging LLMs, workflows, APIs, and inter-agent collaborations, highly efficient automated systems can be built.
- This guide covered essential aspects of setting up, configuring, and troubleshooting agents, ensuring seamless AI integration for various applications.